


Desk Speakers & Desktop Soundbars — The Ultimate 2026 Authority Guide
Overview: This longform guide explains everything you need to know to choose, place, measure, tune and maintain desktop speakers or a desktop soundbar for consistently excellent near-field audio. No model or brand recommendations — only reproducible methods, practical rules, and troubleshooting workflows that deliver repeatable results.
Who this guide is for: office workers, remote presenters, gamers, music listeners, content creators, and anyone who needs great sound from a desk-centric audio setup.
Contents
- Why desktop audio matters
- Near-field physics and perceptual rules
- Speaker & soundbar types — practical behaviors
- Desk Speakers vs Desktop Soundbars: Which Is Better for Your Desk?
- Decision framework: match use, desk and neighbors
- Signal chain & essentials (DACs, amps, connectors)
- Connectivity, codecs and latency
- Placement & geometry — the single most impactful step
- Subwoofer integration: how to do it well
- Desk acoustics & first reflections: practical fixes
- Measurement methodology you can reproduce
- Calibration & EQ — conservative, measurable changes
- Task profiles: office, music, gaming, streaming
- Troubleshooting playbook
- Practical upgrade paths
- Care, longevity and common service questions
- Desk Speaker & Desktop Soundbar Setup Checklist (Printable)
- Complete Ergonomic Desk Setup
- Human-readable FAQ
- References & further reading
Why desktop audio matters
Desktop audio is not a scaled-down living room system. The combination of listening distance, immediate reflective surfaces (desk, monitor) and typical desk clutter makes the design and tuning of desktop audio a different engineering and perceptual problem. Properly implemented, a desk audio system can improve focus, reduce listening fatigue in calls, increase enjoyment of music and improve the accuracy of content-creation work. Done poorly, the same speakers can sound harsh, muddy, and unfocused.
Near-field physics and perceptual rules
In near-field listening (≈0.5–1.5 meters), direct sound dominates. This means:
- Imaging is achievable: small changes in geometry move the stereo image significantly.
- Reflections are sharp: a monitor or glossy desk surface can create narrow spectral peaks or comb filtering that are immediately audible.
- Boundary effects matter: desks and nearby walls alter low-frequency response unpredictably, producing either boundary gain (boom) or cancellations (nulls).
Practical rule: treat placement and desk surfaces as your first, cheapest, and most effective acoustic tools. Optimize physical geometry before spending on more costly components.
Speaker & soundbar types — practical behaviors
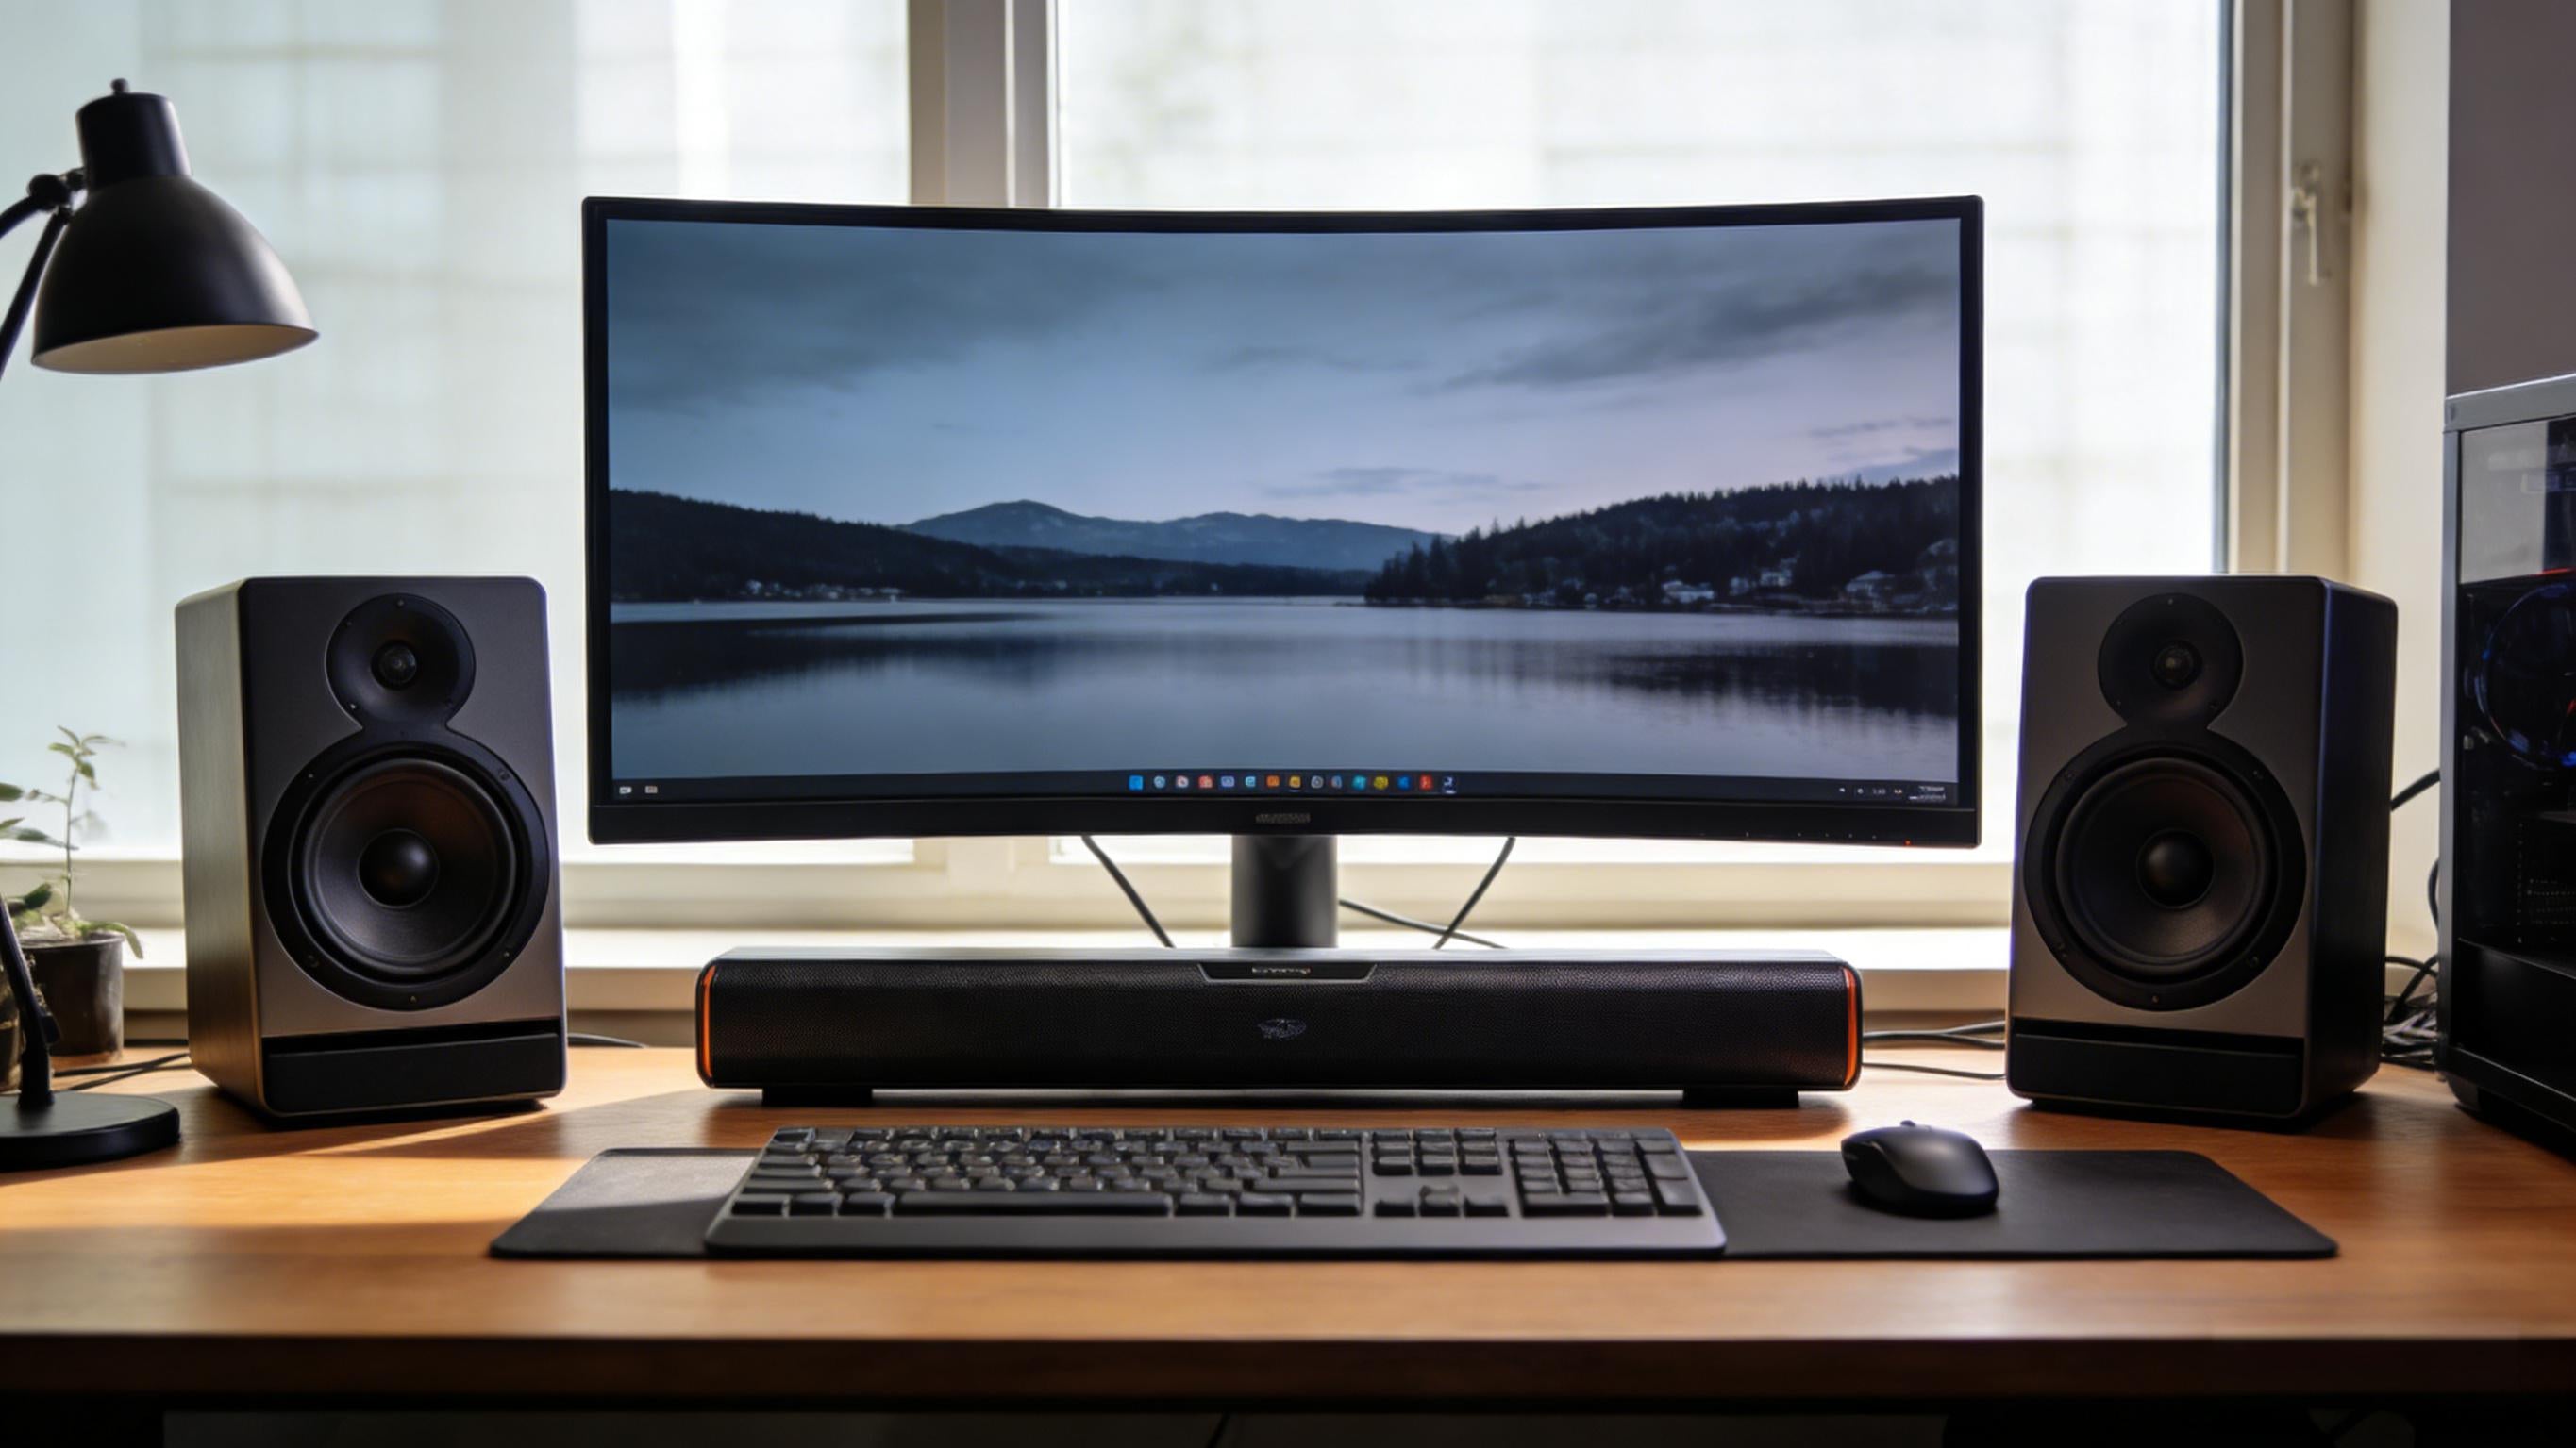
2.0 active speaker pairs
Two powered speakers (left and right). Strengths: strongest stereo imaging and midrange clarity when placed correctly. Expect better separation for music and easier placement testing (measure each channel).
2.1 systems (with subwoofer)
Satellites handle mids & highs, sub handles bass. Strengths: deep impact and convincing low frequencies. Challenges: sub placement and integration—on small desks, subs couple with the desk making control and neighbor disturbance more likely.
Desktop soundbars (single enclosure)
One cabinet with multiple drivers arranged for stereo spread. Strengths: space efficiency and simple wiring. Tradeoffs: less precise stereo localization; driver separation is virtualized via baffle and DSP design.
Near-field studio monitors
Designed for neutral response and revealing detail for production work. They require measurement and minimal acoustic treatment to be useful as a mixing reference but are excellent when accuracy matters.
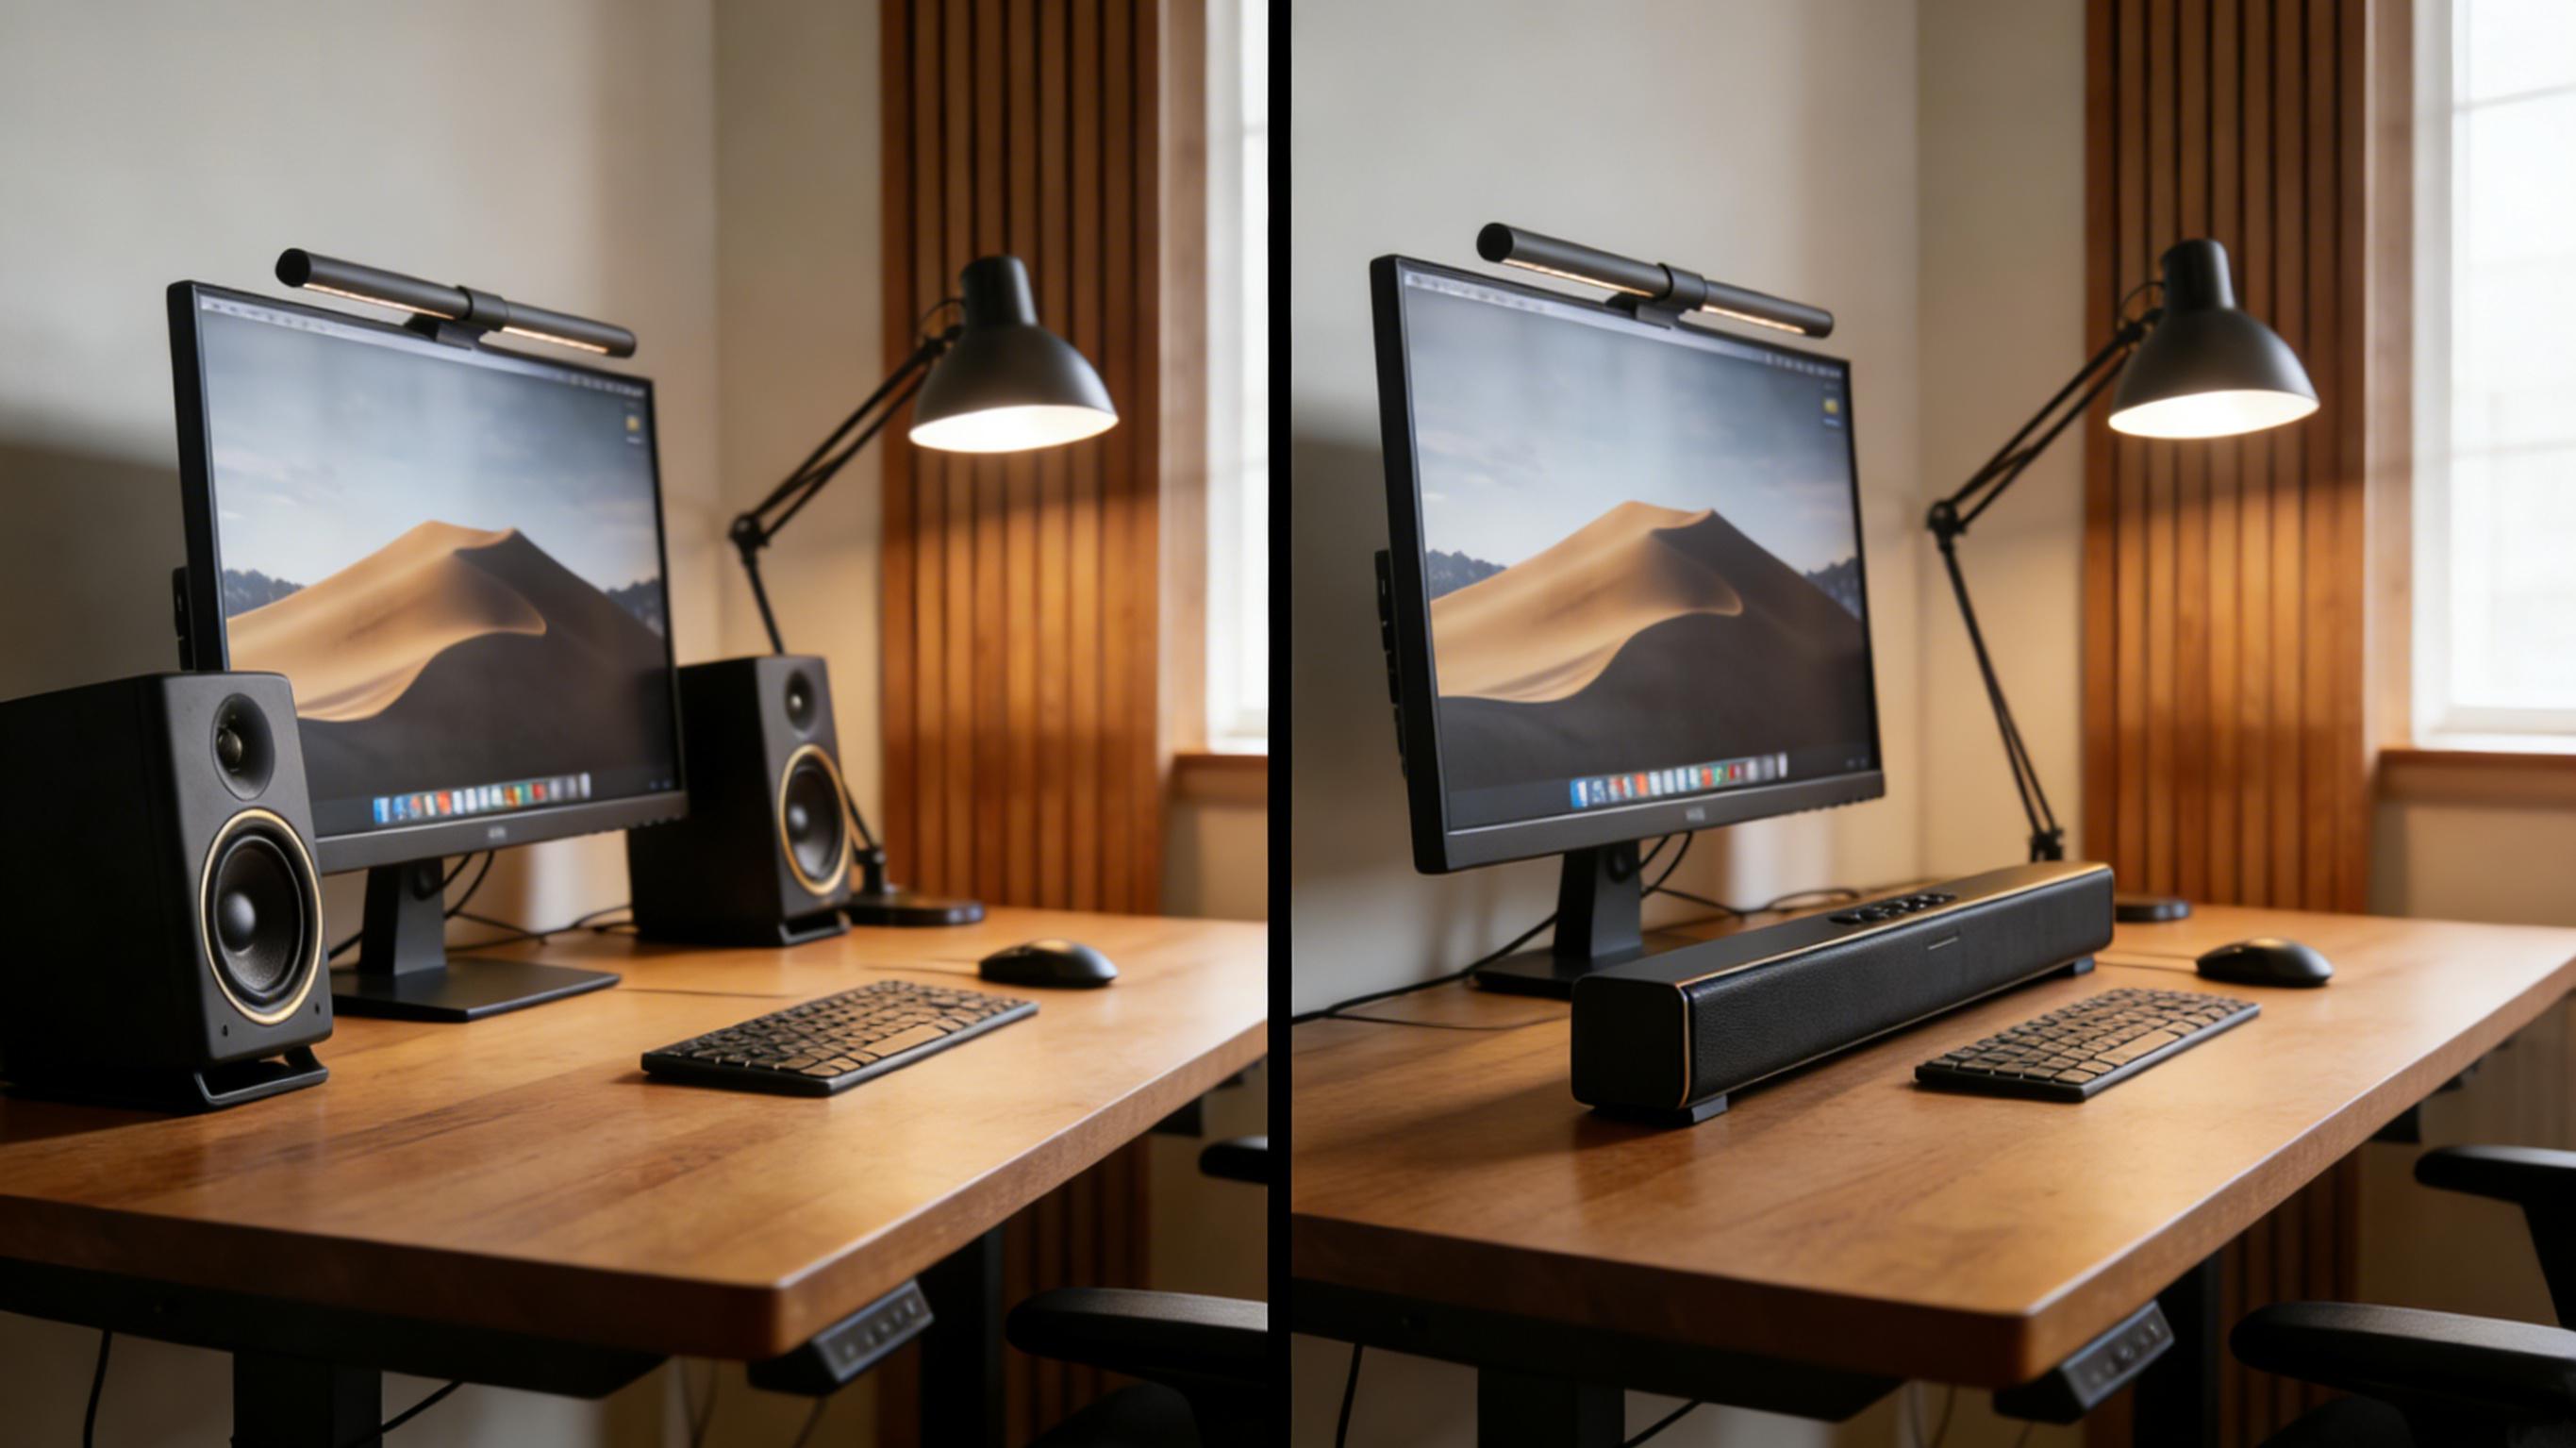
Desk Speakers vs Desktop Soundbars: Which Is Better for Your Desk?
| Feature | Desk Speakers (2.0 / 2.1) | Desktop Soundbar |
|---|---|---|
| Stereo Imaging | True left–right separation with precise positioning | Virtual stereo created by internal driver layout and DSP |
| Desk Space | Requires space on both sides of the monitor | Single slim unit fits directly under or in front of the screen |
| Placement Flexibility | Speakers can be moved, angled, and raised independently | Fixed position limits adjustment options |
| Bass Capability | 2.1 systems can deliver strong, controlled low frequencies | Limited bass due to small internal enclosure |
| Setup Difficulty | Moderate — requires placement and tuning | Very simple — plug-and-play |
| Best Use Cases | Music, gaming, editing, immersive listening | Office work, casual media, minimalist desks |
Decision framework: match use, desk, and neighbors
Make decisions in this order, not the other way around:
- Primary use (calls, music, gaming, editing).
- Desk geometry (depth, width, monitor type, multi-monitor layout).
- Environment constraints (neighbors, room size, floor type).
- Workflow requirements (need for zero latency, moveable setup, shared desk).
Example mapping (rules of thumb):
- Shallow desk (<60 cm depth) + emphasis on voice → soundbar or compact 2.0.
- Wide desk + music enjoyment → separated 2.0 nearfield speakers with isolation pads.
- Gaming + cinematic impact → 2.1, but test for neighbor impact and tune sub carefully.
- Content creation → nearfield monitors + measurement microphone + room treatment.
Signal chain & essentials (DACs, amps, connectors)
To get clean desktop sound, understand the signal chain: source → (digital) → DAC → amplifier → speaker drivers. Key points:
- Digital path quality: using USB or optical often yields cleaner results than relying on an internal laptop analog jack.
- Active vs passive: active speakers include built-in amplification sized for their drivers; passive speakers require an external amp matched to impedance and sensitivity.
- Cables: keep analog cable runs short; use balanced connections for long runs; ensure solid connectors to avoid intermittent noise.
- Ground loops: hum can often be eliminated by reconnecting devices to the same outlet or using a ground isolator in extreme cases.
Connectivity, codecs and latency
Connectivity choices influence convenience, fidelity and latency:
USB (digital)
USB delivers digital audio and relies on the speaker's (or external DAC's) converter. Benefits include bypassing a low-quality internal audio stage and often better SNR; drawbacks are driver dependency and occasionally sample-rate management when multiple devices are present.
Analog (3.5 mm, RCA)
Universally compatible but quality depends on the host's analog stage. For casual listening, it's fine; for critical work, prefer a clean digital path.
Optical / HDMI
Robust digital alternatives—optical is immune to electrical noise; HDMI provides multi-channel and advanced formats with eARC for TVs/monitors. Use these when integrating with other AV devices.
Bluetooth & wireless: codecs and latency
Bluetooth's default SBC codec sacrifices efficiency for universality. Modern codecs—aptX family, LDAC, AAC—vary in latency and fidelity. Low-latency variants (aptX Low Latency / aptX Adaptive / some LDAC implementations) reduce A/V sync and are better for gaming or video. However, codec support must exist on both transmitting and receiving devices, and performance varies by implementation and OS. For a practical primer on codecs and latency tradeoffs, see a concise explanation of Bluetooth codecs.
Practical rule: wire when you need flawless A/V sync (video editing, live streaming, pro gaming). Use Bluetooth for convenience and casual listening, and test the codec in your actual device pairing before relying on it.
Placement & geometry — the single most impactful step
Before any EQ or DSP, fix placement. This yields the biggest audible changes for the least time and money.
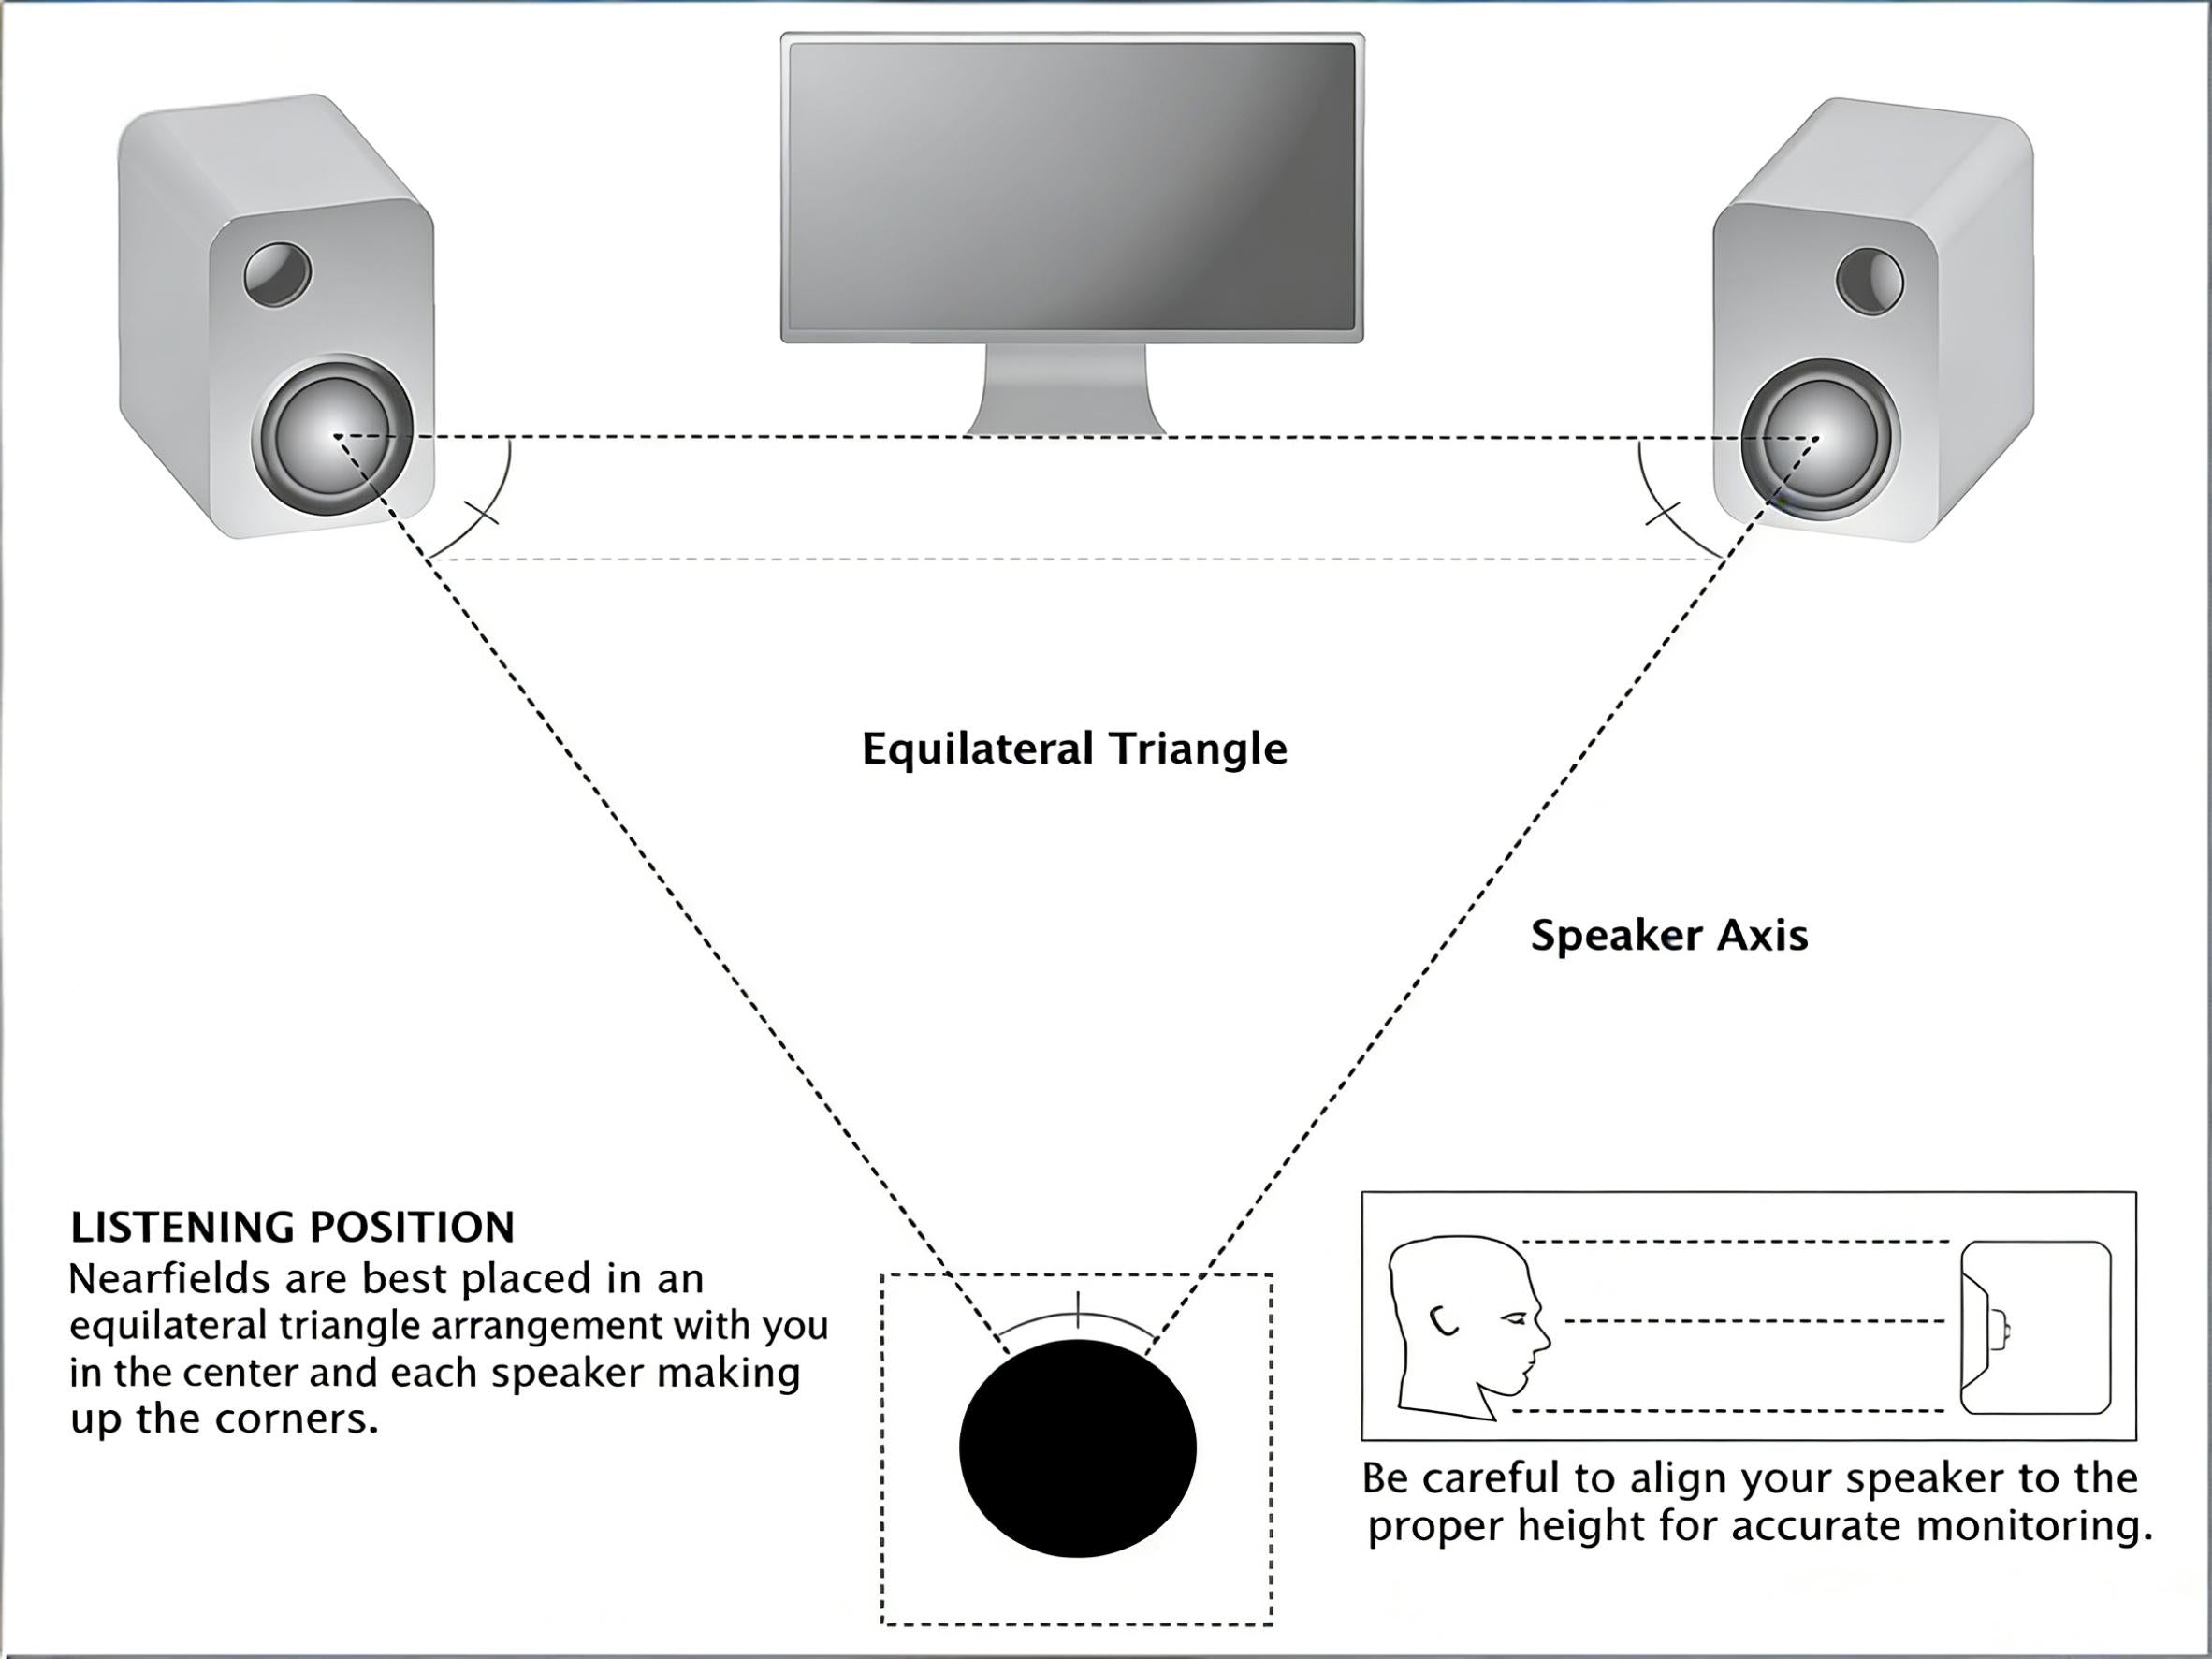
Equilateral triangle and ear height
Strive for an approximate equilateral triangle between left speaker, right speaker, and your head. Aim tweeters at your seated ear height. If you cannot raise speakers, angle them up (toe-up) rather than placing them flat on the desk.
Isolation & decoupling
Speakers on a solid desk couple mechanical energy into the desk, creating coloration and bass resonance. Use small isolation pads or stands to decouple and reduce transmitted vibration.
Monitor reflections
Monitors and glossy surfaces reflect mid/high frequencies back to your ears quickly, creating comb filtering. Move speakers slightly forward of the monitor plane or angle them to avoid a direct reflection path. For more in-depth strategies for controlling reflections and first-reflection points, see acoustic advice on reducing monitor reflections.
Practical placement checklist
- Place speakers symmetrically left/right relative to center monitor.
- Make speaker–ear distances roughly equal.
- Angle speakers toward the ears; prioritize tweeter directionality.
- Use isolation pads or small stands.
- If using a sub, try multiple floor positions — small moves dramatically alter bass.
Subwoofer integration: how to do it well
Sub integration is powerful but tricky. Below are practical strategies for achieving a smooth blend on a desk-centric system.
Why subs are sensitive
Low frequencies interact with room boundaries more strongly and combine additively, creating pronounced nodes and nulls even in small rooms. On desks, structure-borne coupling magnifies unwanted vibration.
Stepwise subwoofer integration
- Start low and slow: set sub level low, and raise until you reach a natural balance rather than perceived loudness.
- Set crossover sensibly: typical desktop crossovers between 60–120 Hz work depending on main speaker low-end extension. Lower crossover if satellites extend well into bass.
- Phase alignment: adjust phase or physical distance to smooth the crossover region and avoid nulls.
- Position testing: move the sub even small distances (20–50 cm) and re-listen — changes are often large.
- Control vibration: use isolation feet and avoid putting subs directly on flimsy desk surfaces.
Desk acoustics & first reflections: practical, minimal solutions
Small, targeted treatments provide much of the benefit of larger room overhauls.
First reflection control
Identify the point on your desk or monitor that reflects sound into your ears: try temporarily placing a towel or blanket over the desk between speaker and listener—if imaging improves, you identified a problem reflection. A small absorptive panel behind or above the monitor reduces harshness and improves imaging. Sonarworks and others describe how addressing first reflections yields measurable improvement in mixes and listening.
Desk mat and isolation
A dense desk mat under the front of the desk and under speakers reduces high frequency scattering and mechanical coupling. Isolation pads under speakers decouple mechanical energy and often improve clarity significantly for little cost.
Soft furnishings & diffusion
Curtains, rugs, and furniture act as broadband absorbers. For extreme problems add small bass traps or porous absorbers near corners, but typically start with small, inexpensive items first.
Measurement methodology you can reproduce (step-by-step)
Measurement turns subjective impressions into actionable numbers. Even with modest equipment you can identify peaks, dips, and timing errors that guide your adjustments.
What you need (affordable & reproducible)
- A measurement microphone (USB or XLR condenser mic that’s flat or at least consistent for comparisons).
- Measurement software capable of swept sine/pink noise and FFT (many free or inexpensive options are available).
- A laptop or device running the software and generating the test signals.
- A stable microphone stand or clamp to place the mic at ear height and keep it consistent between tests.
Industry and lab resources outline measurement best practices and typical test sequences for loudspeakers — following a standardized sweep + THD analysis is a reliable approach. For detailed lab-grade procedures and discussion, see practical measurement resources that demonstrate sweep tests, distortion measurement and interpretation.
Step-by-step protocol
- Document geometry: measure and record the distances from mic to each speaker and mic height relative to the desk and seat.
- Neutral starting point: reset speaker DSP, tone controls and any room correction to neutral.
- Noise floor: measure ambient noise to make sure tests exceed it by a safe margin.
- Swept sine / pink noise capture: run a sweep from 20 Hz to 20 kHz and record.
- Impulse response: capture impulse to evaluate early reflections and time alignment.
- Left/right balance: measure each channel independently to find mismatches that suggest driver or crossover problems.
- THD at multiple SPLs: measure distortion if your gear supports it to spot compression or distortion at louder levels.
- Archive results: save files and annotate: desk depth, monitor type, PAD/stand used, any EQ applied.
Interpretation examples: a narrow 3 kHz spike often indicates a reflection; a broad dip at ~120 Hz commonly points to desk boundary cancellation; very high THD at moderate volume suggests amplifier clipping or driver limit.
Calibration & EQ — conservative, measurable changes
Calibration is not magic — it’s measurement + incremental correction + verification. Use EQ sparingly and prefer physical fixes where possible.
Conservative EQ workflow
- Measure baseline with neutral settings.
- Fix physical issues first (placement, isolation, minor acoustic fixes).
- Apply narrow cuts for narrow resonances (peaks), using a Q shaped filter tuned to the problem band.
- Use gentle, wide shelves for broad tonal balance issues.
- Re-measure after each change and validate with familiar reference tracks.
- Save presets for each task (Call, Music, Game, Mix).
Useful principle: treat EQ as a surgical tool to remove pathology (narrow peaks or resonances), not as cosmetic coloration to create a “sound signature.”
Task profiles: office, music, gaming, streaming
Office & video conferencing
Prioritize speech intelligibility: 1–4 kHz. Keep levels moderate and avoid aggressive low or high-frequency boosts that tire listeners. Use a directional microphone and avoid speaker-to-mic bleed when possible.
Music listening
Start from a neutral baseline and make small, preference-based adjustments. Use tracks you know well as reference; changes should improve the reference perception, not merely alter numbers.
Gaming
Low latency and positional clarity matter. Prefer wired connections or tested low-latency wireless codecs. Keep subwoofer levels under control so impact does not mask positional audio cues like footsteps.
Content creation & mixing
Accuracy is the goal. Use near-field monitors, measure, calibrate to a flat response wherever possible, and cross-check on headphones and consumer speakers to ensure mix translation.
Troubleshooting playbook
A structured diagnostic approach is faster and less error-prone than random tinkering.
No sound
- Check power and mute states.
- Confirm correct output device in OS and app settings.
- Swap cables & ports to rule out a bad cable or port.
- Test with another source (phone/tablet) to isolate host vs speaker.
Hum or buzz
- Reconnect devices to the same outlet or try a different power strip.
- Disconnect other electronics to find the interacting device.
- Use a ground loop isolator if necessary (last resort).
Intermittent dropouts
- For wireless: check interference, distance and codec support.
- For wired: replace cable and inspect connectors.
- Check driver/firmware updates for sources and speakers.
Imaging or tonal issues after setup
- Verify equal distances and angular symmetry.
- Adjust toe-in and height; small changes yield big differences.
- Measure to find peaks/dips before applying EQ.
Practical upgrade paths
Upgrade incrementally to maximize value:
- Placement & isolation — always the first upgrade.
- Measurement mic & software — gives objective feedback.
- Better speakers or a higher quality soundbar that fits your desk geometry.
- External DAC if you need consistently clean digital conversion or advanced interfaces.
- Subwoofer only after careful measurement and placement testing.
- Room treatment for creators: targeted absorption and bass trapping improves translation.
Care, longevity and common service questions
Extend product life with simple habits: keep drivers dust-free, avoid direct sunlight, keep firmware updated and use protective packing when moving speakers. For warranty and service, prefer vendors who provide documented parts or service policies if long-term support is important to you.
Desk Speaker & Desktop Soundbar Setup Checklist (Printable)
Use this checklist to set up, tune, and maintain your desktop audio system for clear voice, accurate music, and immersive gaming.
A. Desk & Speaker Placement
- ☐ Desk surface is free of large reflective objects between speakers and ears
- ☐ Left and right speakers are placed symmetrically
- ☐ Tweeters are at or angled toward ear height
- ☐ Speakers form a triangle with the listening position
- ☐ Isolation pads or stands are installed under speakers
B. Connections
- ☐ Correct output device selected in the operating system
- ☐ USB, optical, HDMI, or analog connection confirmed
- ☐ All cables are fully seated and undamaged
- ☐ Bluetooth latency tested (if using wireless)
C. Initial Tuning
- ☐ Volume set to a comfortable listening level
- ☐ Bass and treble controls set to neutral
- ☐ Subwoofer level adjusted conservatively (if used)
- ☐ Left and right channel balance verified
D. Calibration
- ☐ Reference tracks or test tones played
- ☐ Harsh peaks or boomy bass identified
- ☐ Small EQ adjustments applied where needed
- ☐ Presets saved for work, music, and gaming
E. Maintenance
- ☐ Speaker grills cleaned regularly
- ☐ Firmware or drivers updated
- ☐ Cables inspected every 6 months
Tip: You can convert this checklist into a printable PDF or a one-page setup card for new desk builds.
Helpful Guides to Complete Your Workstation Setup
A great audio setup enhances your productivity and focus, but a truly efficient desk also depends on ergonomic posture, screen alignment, and device connectivity. Explore the following guides to optimize your complete workspace experience.
Monitor Stand & Screen Alignment Guide
Proper monitor height reduces strain and provides better visual focus during work and media sessions.
USB Hub vs Docking Station Guide
Choose the right hub/dock to connect your speakers and peripherals cleanly and efficiently.
Desk Cable Management Without Drilling
Hide and organize cables from speakers and other devices for a cleaner workspace.
Human-readable FAQ
Do I need a subwoofer for a desk?
Not always. If you want physical bass impact (explosions, dance music), a sub can add realism. However, in many desk environments a properly tuned 2.0 pair yields clearer mids and better positional cues than a poorly integrated subwoofer.
Is Bluetooth good enough for conferencing?
Bluetooth is often adequate, but wired solutions are more consistent, have lower latency, and are preferable for live production or professional remote interviews.
Why does my desk sound boomy?
Boundary gain from the desk and nearby walls reinforces certain bass frequencies. Move speakers, add isolation, and test sub placement. If boom persists, measure to identify specific problem bands for targeted mitigation.
References & further reading
The following resources are cited for readers who want deeper technical or lab-grade perspectives:
- How to Measure a Loudspeaker — Listen, Inc. — practical demonstration of sweep tests, distortion and frequency response measurement.
- Understanding Bluetooth Codecs — SoundGuys — clear breakdown of codecs, tradeoffs and latency considerations.
- aptX & Bluetooth Codecs Primer — TechRadar — codec variants and practical device compatibility notes.
- Near-Field Monitors Explained — Produce Like A Pro — role and behavior of near-field monitors for small rooms.
- Killing First Reflections — Sonarworks — practical approaches to identifying and treating first-reflection issues on desks.
